---
title: Use Discover sessions in dashboards
description: Add the chart, the table, or a whole Discover session to a dashboard, and manage how a session panel appears.
url: https://www.elastic.co/docs/explore-analyze/discover/use-sessions-in-dashboards
products:
- Elastic Documentation
- Kibana
applies_to:
- Elastic Cloud Serverless: Generally available
- Elastic Stack: Generally available
---
# Use Discover sessions in dashboards
If you want what you found in **Discover** next to your other dashboard panels, you can put its chart, its table, or a whole Discover session on a dashboard. A panel is one tile on a dashboard. Once a session is on a dashboard, you can edit it there, save your edit as a new session, or switch which tab the panel shows.
- [Add Discover visualizations to dashboards](#add-discover-visualization-to-dashboard): Save the chart that your query produces as a visualization panel.
- [Add Discover tables to dashboards](#add-discover-tables-to-dashboards): Save the table as a panel, starting from **Discover** or from the dashboard.
- [Manage Discover session panels on a dashboard](#manage-discover-session-panels): Edit a session panel, save your edits as a new session, or select which tab to display.
## Before you begin
- To add content to a dashboard, you need permission to view and create dashboards, which the **All** privilege for the **Dashboard** feature grants. Without it, the options to add content to a dashboard aren't available.
- To create a session directly on a dashboard, you also need access to **Discover**.
- To add a whole session from **Discover**, save it first. Saving needs the **All** privilege for the **Discover** feature, and the session is stored in the [library](/docs/explore-analyze/discover/save-open-search#_save_a_discover_session). Refer to [Save and manage Discover sessions](/docs/explore-analyze/discover/save-open-search#_save_a_discover_session).
- To edit a session panel on a dashboard, you also need to be able to edit that dashboard.
- To add a chart from classic mode, **Lens** must be available, because the chart opens there for editing.
## Add Discover visualizations to dashboards
When a query in Discover produces a chart, you can save that chart as a visualization panel on a new or existing dashboard, without saving the Discover session itself. The exact steps depend on the [query mode](https://www.elastic.co/docs/explore-analyze/discover/switch-esql-mode) you're using in Discover.
### In ES|QL mode
1. In Discover, run an ES|QL query that produces a chart.
2. Next to the chart, select `add_to_dashboard` **Save visualization to dashboard**. In earlier versions, select `save` **Save visualization**.
3. Enter a title for the panel, and optionally a description.
4. In **Add to dashboard**, select **New** to create a dashboard, or **Existing** to select one from the list.
5. Select **Save and go to dashboard**.
**Result:** The chart appears as a visualization panel on the dashboard.
In 9.2, if your ES|QL query defines [variable controls](https://www.elastic.co/docs/explore-analyze/discover/esql-variable-controls), they aren't added to the dashboard when using this method. To preserve them, follow [Import a Discover query along with its controls into a dashboard](/docs/explore-analyze/discover/esql-variable-controls#import-discover-query-with-controls) instead.
### In classic mode
In classic mode there's no direct save button next to the chart. Instead, you open the chart in **Lens**, edit it as needed, and save from there.
The `pencil` **Edit visualization** button appears only when you query a time-based data view whose time field can be visualized, and **Lens** is available.
1. In Discover, run a query that produces a chart.
2. Next to the chart, select `pencil` **Edit visualization**. The chart opens in **Lens**, prefilled with your current query and time range.
3. In Lens, adjust the visualization as needed.
4. Select **Save** in the Lens application menu.
5. Enter a **Title** for the panel, and optionally a **Description**.
6. In **Add to dashboard**, select **New** to create a dashboard, or **Existing** to select one from the list.
7. Select **Save and go to dashboard**.
**Result:** The visualization appears as a panel on the dashboard.
## Add Discover tables to dashboards
To add the table from a Discover session to a dashboard, pick the option that matches what you want:
- For a one-time copy of the current table that later session changes don't affect, save the current table to a dashboard.
- For a session that you reuse and that updates on every dashboard that shows it, save the session to the library, then add it to a dashboard.
- For a table that exists only on one dashboard, create a Discover session on the dashboard.
The steps depend on where you start:
- From Discover:
- [Save the current table to a dashboard](#save-table-to-dashboard)
- [Save a Discover session and add it to a dashboard](#save-discover-session-with-add-to-dashboard)
- From a dashboard:
- [Add a Discover session from the library](#add-discover-session-from-library)
- [Create a Discover session on the dashboard](#add-ad-hoc-discover-session-panel)
### Save the current table to a dashboard
- Elastic Cloud Serverless: Generally available
- Elastic Stack: Generally available since 9.4
From Discover, save the current view of the table to a new or existing dashboard, without saving the Discover session to the library. The resulting panel stores its configuration with the dashboard, so later changes to the Discover session don't affect the panel. If the session has multiple tabs, only the current table is saved.
1. In the documents table toolbar, select `add_to_dashboard` **Save table to dashboard**.
2. Enter a title for the panel, and optionally a description.
3. In **Add to dashboard**, select **New** to create a dashboard, or **Existing** to select one from the list.
4. Select **Save and go to dashboard**.
**Result:** The table appears as a panel on the dashboard.
The button doesn't appear if you opened **Discover** from a dashboard panel, or if you can't create dashboards.
### Save a Discover session and add it to a dashboard
From Discover, save the entire Discover session, including all its tabs, columns, sort order, and other settings.
When you save a Discover session, it is saved to the library. When you save a new session, or save an existing one as a new session, the **Add to dashboard** option of the dialog also lets you decide whether to add it as a panel on a dashboard. The option isn't available when you save changes to a session that already exists:
- **Existing**: The session is also added as a panel on a dashboard you select.
- **New**: The session is also added as a panel on a new dashboard.
- **None** (the default): The session is saved to the library only. To add it as a panel later, [add it from the dashboard library](#add-discover-session-from-library).
If the session has multiple tabs, you can [select which tab the panel displays](#discover-session-choose-tab) on the dashboard.To do this, save the session as described in [Save a Discover session](/docs/explore-analyze/discover/save-open-search#_save_a_discover_session), and set **Add to dashboard** to the option that matches what you want.
Saving from Discover saves the session to the library only. To put it on a dashboard, follow the steps under [Save a Discover session](/docs/explore-analyze/discover/save-open-search#_save_a_discover_session), then [add the session from the dashboard library](#add-discover-session-from-library).
**Result:** The session is saved to the library, and it also appears as a panel on the dashboard if you selected one.
### Add a Discover session from the library
From a dashboard, add a Discover session that's already saved to the library. The same session can be added to multiple dashboards, and each panel stays linked to the [library](/docs/explore-analyze/discover/save-open-search#_save_a_discover_session), so updates to the session show on every dashboard that uses it. To stop a panel from following the session, open the panel's menu and select **Unlink from library**.
This option requires that the session has already been [saved to the library](/docs/explore-analyze/discover/save-open-search#_save_a_discover_session).
1. Go to **Dashboards**.
2. Open or create the dashboard, then switch to **Edit** mode if necessary.
3. Select **Add**, then open the **From library** tab. In earlier versions, select **Add from library**.
4. From the **Types** dropdown, select **Discover session**.
5. Select the Discover session that you want to add.
**Result:** The session appears as a panel on the dashboard, linked to the library.
If the session has multiple tabs, you can [select which tab the panel displays](#discover-session-choose-tab) on the dashboard.
### Create a Discover session on the dashboard
- Elastic Cloud Serverless: Generally available
- Elastic Stack: Generally available since 9.4
Use this option to create a single-tab Discover session directly on the dashboard, without first saving it to the library. The session is stored only with the dashboard.
The dashboard must be in **Edit** mode.
1. Select **Add** → **New**, then select **Discover session**.
2. Configure the session. It starts in ES|QL mode with an empty query. Enter a query, adjust columns, sort, and apply other view settings as needed.
3. Select **Save and return** in the application menu to add the configured panel to the dashboard.
**Result:** The session appears as a panel on the dashboard, stored only with the dashboard.
## Manage Discover session panels on a dashboard
To open the session behind a panel in **Discover** without editing the panel, refer to [Open the data behind a panel in Discover](/docs/explore-analyze/dashboards/using#explore-panel-data-in-discover).
### Save panel edits as a new Discover session
- Elastic Cloud Serverless: Generally available
- Elastic Stack: Generally available since 9.4
When editing a Discover session panel from a dashboard, you can save your changes as a new Discover session, instead of updating the panel in place. This works whether the panel was added from the library or created directly on the dashboard.
1. On the dashboard, hover over the panel and select `pencil` **Edit Discover session configuration**.
2. If the panel was added from the library, select **Edit in Discover**. A panel that you created on the dashboard opens in **Discover** right away. **Discover** shows the panel's session, and the application menu shows **Save and return**.
3. Make your changes in **Discover**.
4. In the application menu, from the menu next to **Save and return**, select **Save as**.
5. In the **Save Discover session** dialog, enter a **Title** for the new session, and optionally a **Description** and [**Tags**](https://www.elastic.co/docs/explore-analyze/find-and-organize/tags).
6. Elastic Cloud Serverless: Generally available Elastic Stack: Generally available since 9.5 In **Add to dashboard**, decide whether to also add the new session as a panel on a dashboard. The session is saved to the library in all cases.
- **Existing**: The session is also added as a new panel on a dashboard you select. The original panel stays as it is.
- **New**: The session is also added as a panel on a new dashboard.
- **None** (the default): The session is saved to the library only, and **Discover** shows the new session.
7. Select **Save**.
**Result:** A new Discover session is saved with the title you entered.
### Select which tab a session panel displays
- Elastic Cloud Serverless: Generally available
- Elastic Stack: Generally available since 9.4
A Discover session panel displays one tab at a time. When the underlying session has multiple tabs, you can change which tab the panel shows. This applies to panels that you added from the library. A panel that you created on the dashboard has a single tab.
1. On the dashboard, hover over the panel and select `pencil` **Edit Discover session configuration**.
2. From the tab selector, select the tab you want to display.
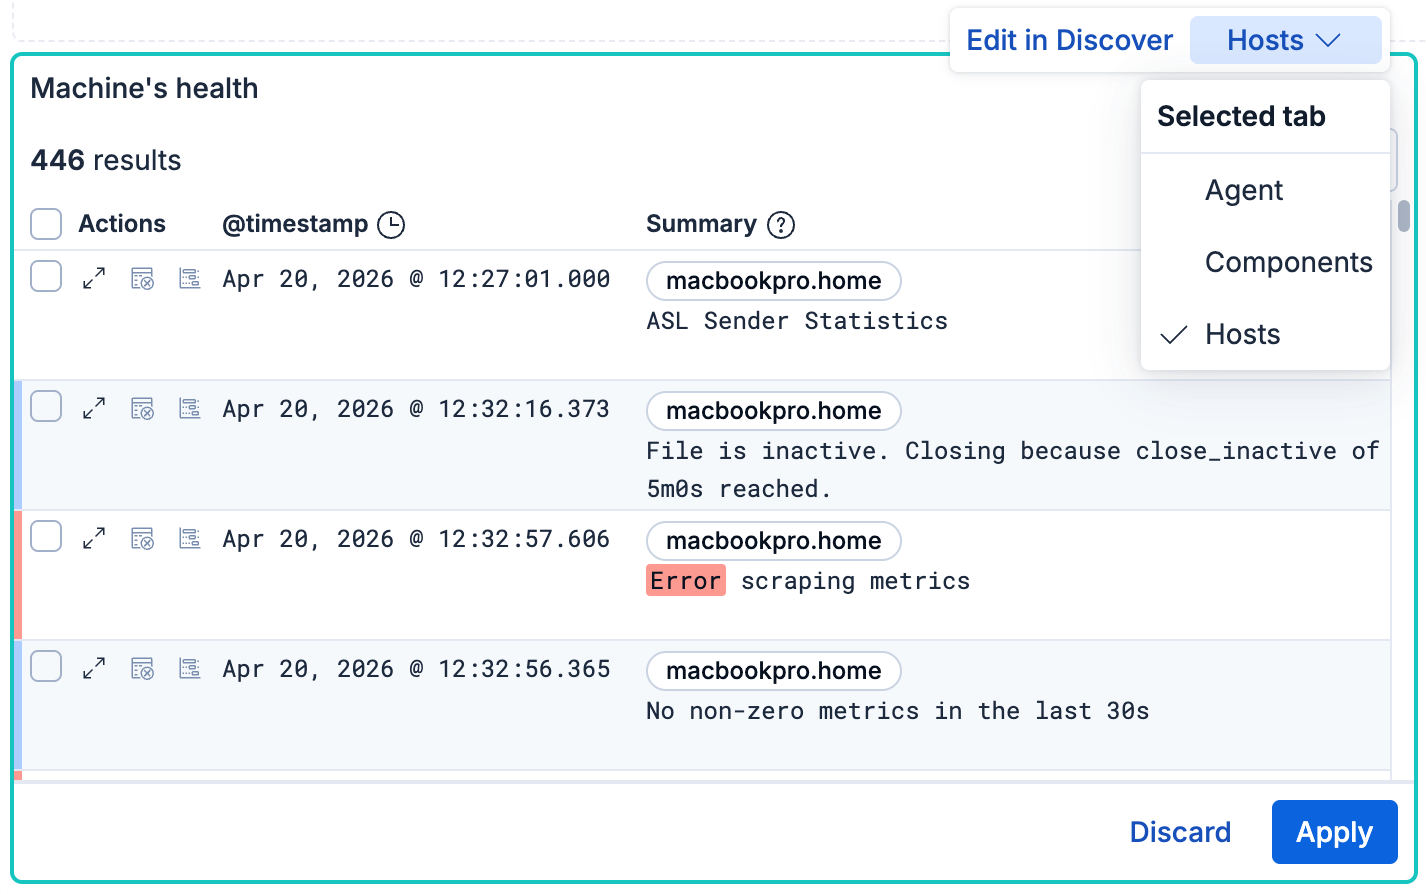
3. Select **Apply**. To keep the tab that the panel showed before, select **Discard** instead.
**Result:** The panel shows the tab you selected.
## Next steps
- [Organize dashboard panels](https://www.elastic.co/docs/explore-analyze/dashboards/arrange-panels): Position and resize the new panel on the dashboard.
## Related pages
- [Save and manage Discover sessions](https://www.elastic.co/docs/explore-analyze/discover/save-open-search)
- [Create a dashboard](https://www.elastic.co/docs/explore-analyze/dashboards/create-dashboard)
- [Add variable controls to Discover queries](https://www.elastic.co/docs/explore-analyze/discover/esql-variable-controls)